


4 Warm-Ups to Better Line Control
One of the fastest ways to improve your drawing is to develop better line control. Even stick figures look better when they have variations in line weight.
Line control is the ability to change between light (or thin) lines and dark (or thick) ones—and knowing when to do so. Proper application of line weight can make even a simple line drawing appear more realistic and 3-dimensional.
In this post I’ll share 4 short warm-ups that are great for doodling and quick practice at any time, which will help you develop great line control.
The Homeschool Art Course is a weekly micro-lesson in drawing, building the skillset to draw realistically—even from imagination.
For this lesson, you’ll need a pen or pencil that allows for variations in marks. Any regular wood pencil or ballpoint will be perfect. A monoline (line of a uniform thickness) will be unsuitable for this exercise.
TIP: You’ll have best results with a dull (unsharpened) pencil or a broad-tipped ballpoint.
Students often like to begin this lesson with the “engraving” exercise shown in the previous post—so give that a try as you’re getting started.

Warm-Up 1
Wood Grain Lines
Most students start out drawing “hard”—putting a lot of pressure on the point of their pen or pencil when they make marks. This is usually how we write, and we are used to using a single level of pressure to make our letters look relatively uniform. (Children are still developing their muscles and hand strength to write, and often press hard because they lack the strength for fine control.)
However, when we draw, we need a significantly greater range of marks. These exercises in making thick-thin lines are great for improving dexterity.


Make straight lines, pressing hard at first and then “lifting off” to make very light lines. When making a light line, the tip of the pencil need only barely touch the paper.
Then, try making thick-to-thin-to-thick lines, or starting with a light touch to make thin-to-thick lines. You can make them as long as you’d like, and repeat as many times as you want.
I call these “wood grain lines” because they make great texture when drawing wood (or tree bark).
Warm-Up 2
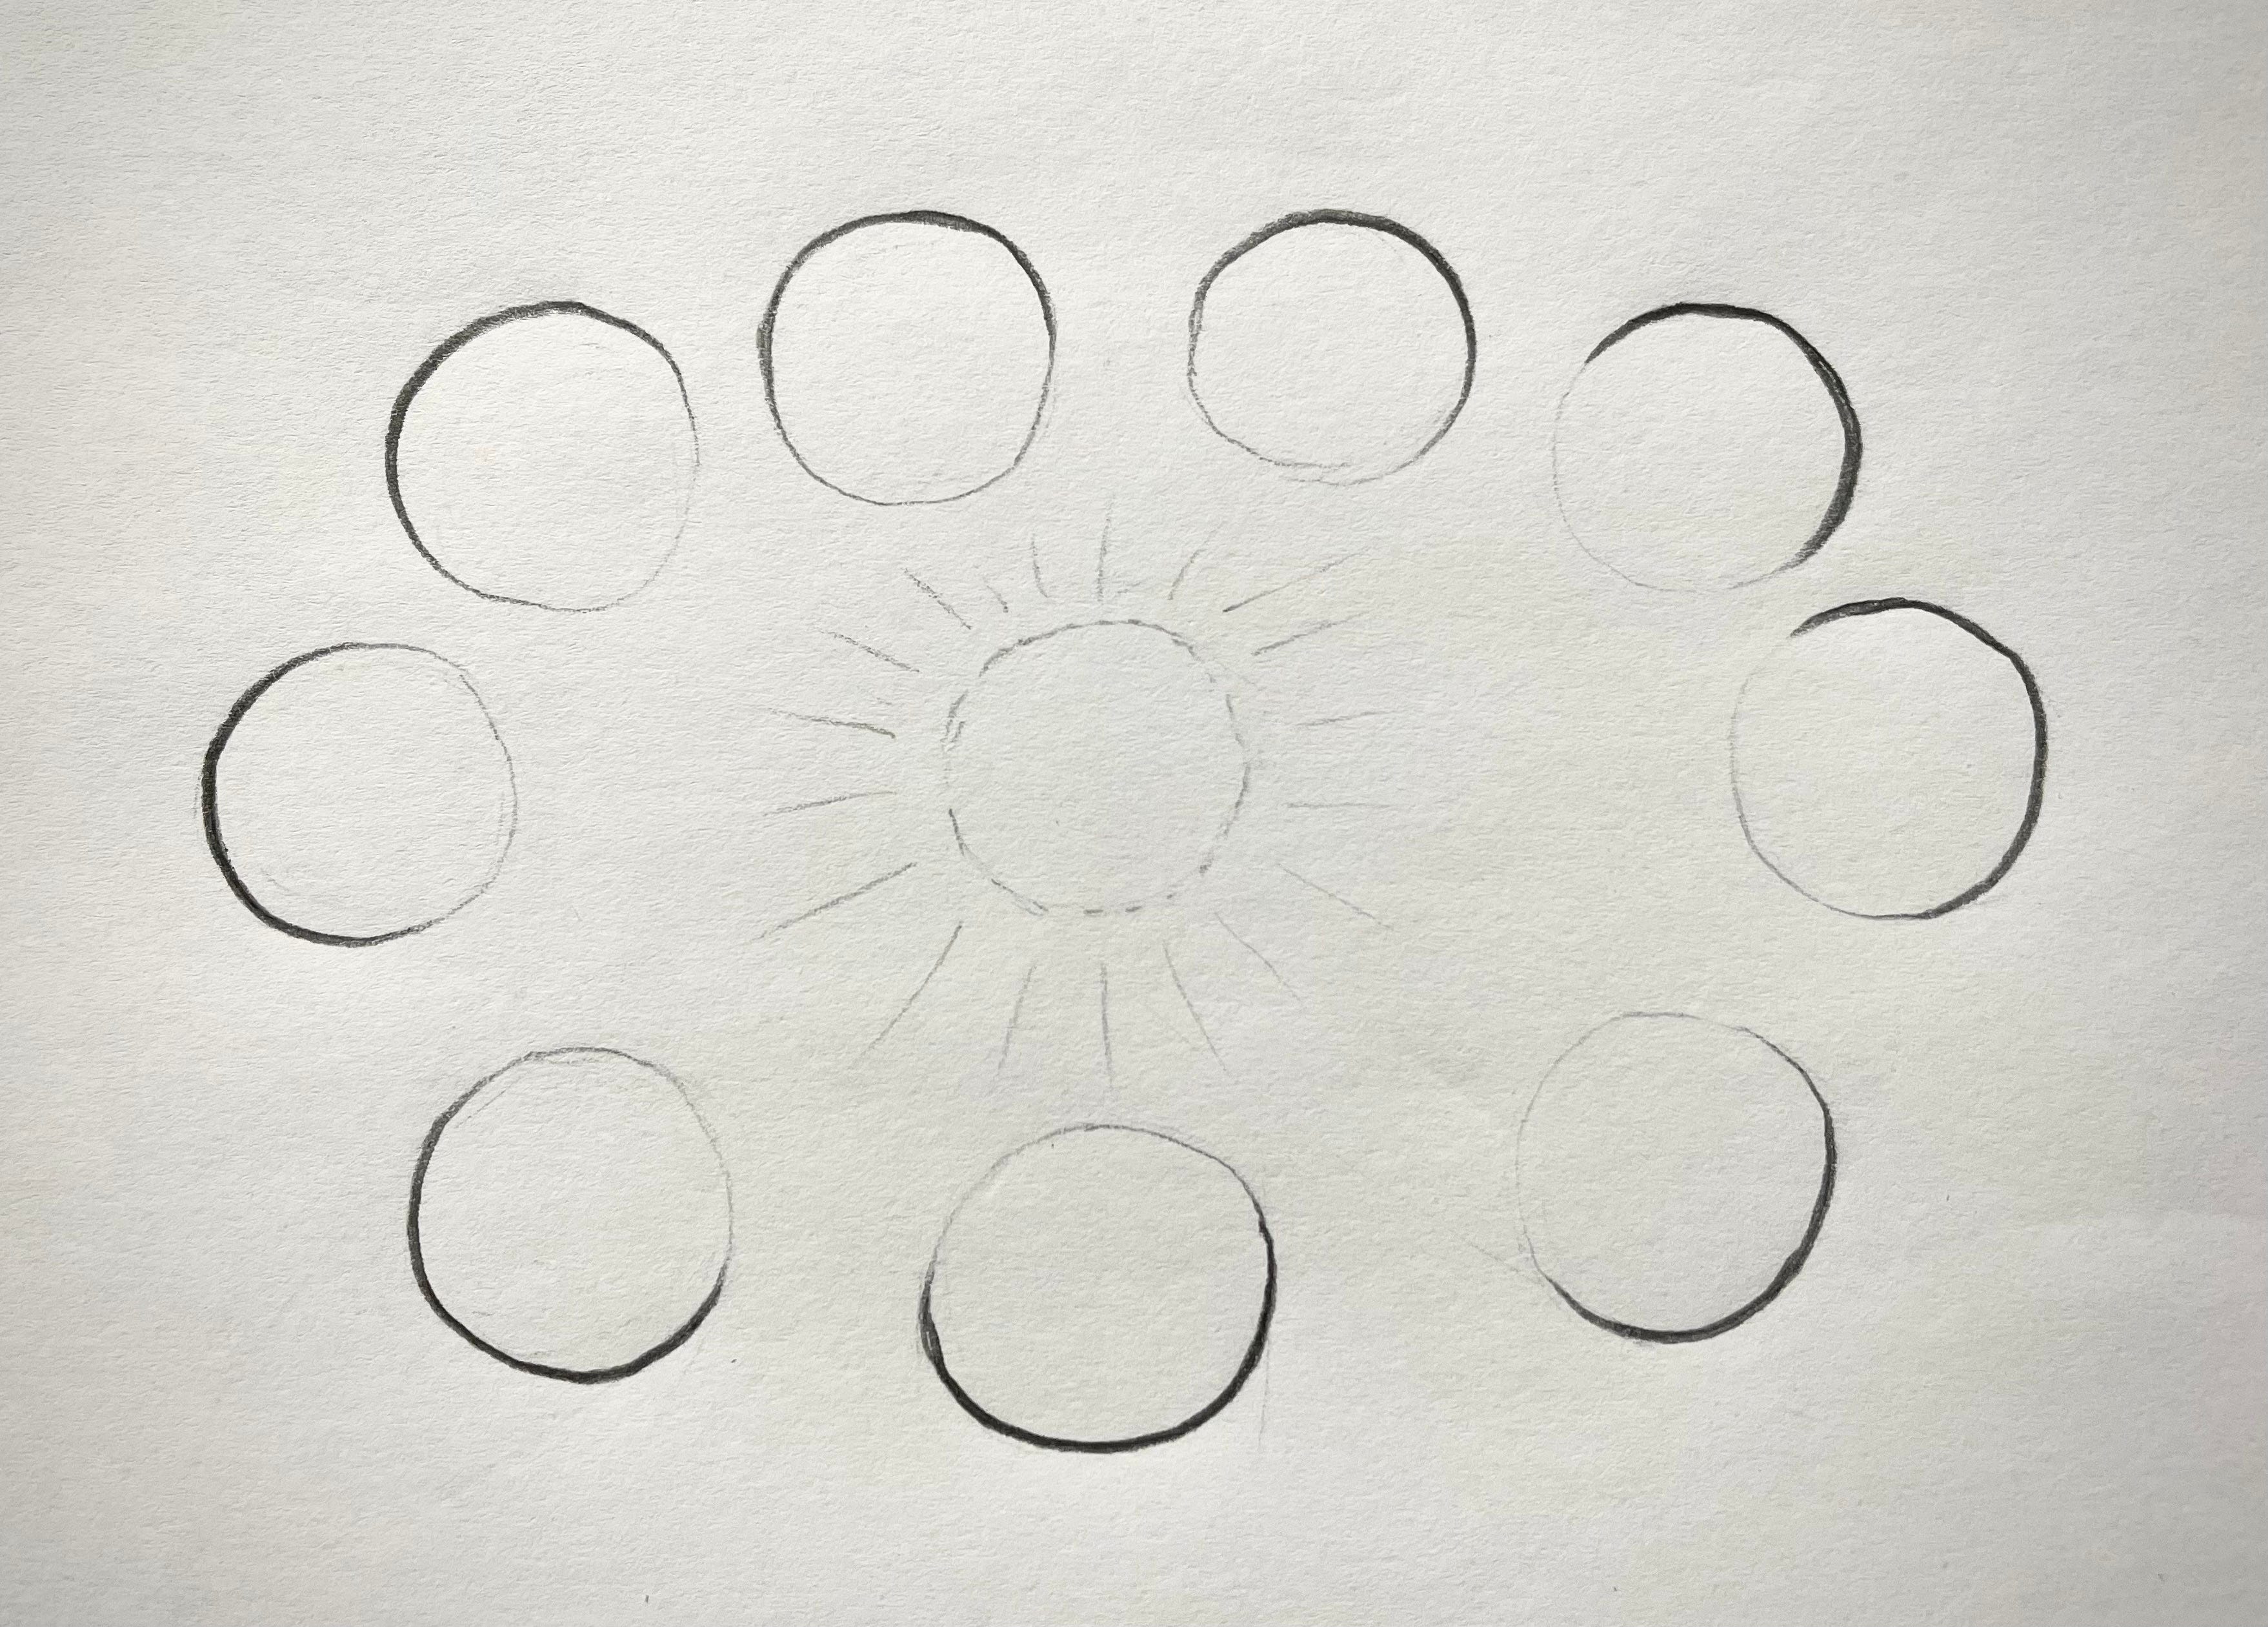
Weighted Circles
Have you been practicing drawing circles and balls? Revisit the previous lesson on drawing circles if you need a refresher. (Remember the key idea from that lesson was drawing from the shoulder.)
For this warm up, we’ll practice circles and balls the same as before—but with the added skill of thick-and-thin lines.
This helps give the “ball” a sense of weight and dimension, even when it’s still just a circle. To do this, start by drawing lightly, then press hard at the bottom or underside of the ball, and and lift off as you move around toward the top of the circle.
As before, you can go several times around the circle to make it more round if your first attempt is a little wonky. Use thick-thin lines in the same place each time.
Or, as in the second example below, you can draw a circle lightly first, to give yourself a guide, and then go over it with a thick-thin line.
TIP: Remember your goal is to practice so that you can get a decent circle on your first pass, so don’t go around more times than you need to.


The line weight doesn’t always have to be directly on the bottom. Try to intentionally start and stop your thick and thin sections at different points around the circle.
TIP: Remember these are only warm-ups. Frequency is more important than duration when practicing these. It’s usually better to do them often—several times a day—and spend 30 sec-2 min or so on them, rather than devote an hour on it once in a week.
Spend maybe 5-10 minutes on them the first time, to get the hang of them, and then let them just be warm-ups after that.
Warm-Up 3
Calligraphy Practice
Now that you’ve got the hang of those thick-thin practices, the next level up is to make calligraphic loops and figure-eights.


In calligraphy, the downstroke is always pressing hard while the upstroke is light and thin.
For your first attempts, just get into the rhythm of a hard downstroke and a light upstroke.
Once you’ve gotten the hang of that, try to make your loops as uniform in shape and size as you can—while maintaining that thick-thin rhythm.
This is a great way to practice your line weight with intentionality. When you’re doing wood grain lines and weighted circles, it’s easy to get “close enough” to what you intended and let yourself move on. However, with calligraphy the goal is to produce near-perfect consistency in the transitions between thick and thin and the size and shape of the loops.
When you can make a set of loops with a high degree of consistency, you have developed excellent line control. Don’t be hard on yourself if it takes a while to get there. It’s all a matter of practice.
After you’ve gotten better consistency, go nuts! These loop-de-loops make great decorations and borders:


Warm-Up 4
The Bean
Once you’re rocking those thick-thin rhythms in straight and curved lines, you’re ready to apply this new skill to the Drawing Process. We’ll do this with a simple 2-step process for practice.
Step 1: The Underdrawing
For this step, you’ll use only light lines. This is possibly the most frequent exhortation in my drawing classes, typically phrased as “Draw softly!” This is what you should be doing in the early stages of almost any drawing you do.
I often describe the underdrawing as a secret you share with your paper: you should practice drawing lines so soft and “quiet” that only you can really see them. These are your guidelines. You’re the only one who needs to know where they are.
Start by drawing two overlapping circles—softly. Make one smaller than the other for more interest.


Step 2: The Contour
Next, you’ll draw an outline around these two overlapping circles, using line variation. Pick one side to be light, and the opposite side should be dark.
Pay attention to how I connect the two circles in my outline, to make them into one shape. Use a curved line as a connector on one side, rather than tracing your underdrawing exactly. One circle is made to look like it is in front of the other by adding a “crease” on one side.


This makes a special compound form that artists use frequently, often called the “bean” or “peanut.” It is used extensively in figure drawing, and has other applications as well. It is a good idea to get very familiar with it, in as many variations as you can come up with.
For added value, practice drawing dividing lines, much as we did with the ball, to better describe the shape’s 3D form.


These are a great ways to practice while doodling! Do this sort of thing as often as you can, and you’ll very quickly see improvement in your work.
Thanks for participating in the Homeschool Art Course! I’d love to see your drawings and cheer on your progress. Feel free to email me back with photos, or share your drawings and doodles in the chat on the Substack app!
HAPPY DRAWING!

Skills in this lesson on Media and Handling:
Thick-thin line variation
Using light/soft lines in early stages of the Drawing Process
Use these lesson objectives to monitor your progress. These micro-skills may not seem like much on their own, but they are each important building-blocks in your drawing repertoire. Celebrate the accomplishment of each one!
Thanks for reading! Support my work with a like, comment, and share!