


Get a Grip!
Good handwriting requires precise control in a small area, and strives for consistency. Drawing, on the other hand, requires a lot more versatility. When we draw, we need to be able to make both long marks—sometimes the full breadth of the paper—and very short, detailed marks. Our marks may be very fine and thin, as well as broad and thick. And any one of these may need to be straight or curved!
This increased range of motion and expression required in drawing often makes it necessary to exchange the standard “tripod grip” we use in writing for other, more flexible options when we draw.
The Homeschool Art Course is a weekly micro-lesson in drawing. Together, we’ll build the skillset to draw realistically—even from imagination.
The Tripod Grip
In this lesson, we’ll learn several different ways to hold the pencil while drawing, in order to get the kinds of marks we want to make.
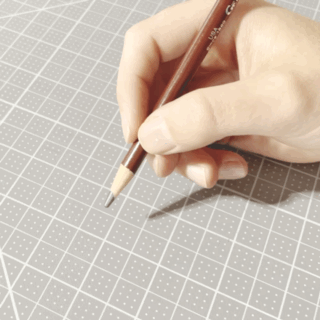
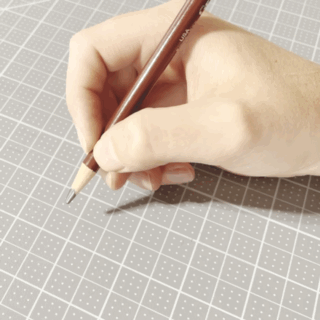
To begin, let’s review the standard Tripod Grip. Although artists often use other grips, the Tripod is still a very useful one for drawing. Its primary use for drawing is in fine details—and these can sometimes be very time consuming and intensive.
Holding your pencil incorrectly can drastically increase fatigue while drawing or writing, especially over extended periods of time.
Unfortunately, many children are not taught and monitored to ensure they are holding their pencils correctly, and develop bad grip habits. Many adult drawing students struggle as a result of this, so it’s well worth checking to make sure you are holding your pencil well. Help guide your children with frequent, gentle reminders.
TIP: If you (or your child) often complain of a tired hand after a drawing session, first check to make sure that the pencil is being held properly, as demonstrated below.
Next, check to make sure the grip is not too tight. White-knuckling it will definitely increase fatigue.
Also, make sure to pause frequently, setting your pencil down, to relax and stretch the hand. This is always a good practice.
Grip the pencil between the thumb and forefinger of your dominant hand, then rest it on your middle finger. Your grip should be relaxed, but controlled. It should not be too close to the point of the pencil. The heel of your hand should rest calmly on the paper, allowing you to move your hand smoothly over the surface.
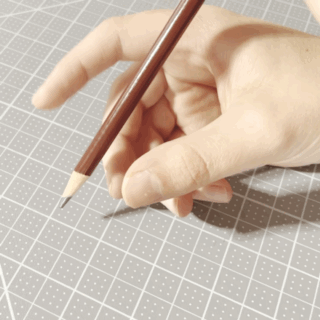
As the name suggests, the Tripod Grip should have three points of contact with the fingers. This allows maximum stability and flexibility.
Incorrect Grips
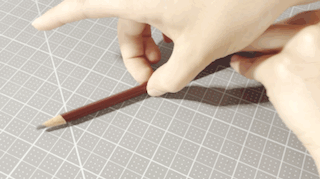
There are many common problems. For example, using four fingers instead of three may be the most prevalent. This happens when the pencil rests on the fourth finger, rather than the middle finger.
Do not bunch your fingers right up close to the point of the pencil. There should be roughly 2-3 finger widths between the point and your grip, since the pencil is resting on three fingers: middle, fourth, and pinky stacked together. The point of the pencil should easily reach the paper, without having to uncomfortably bunch the fingers or twist the hand.
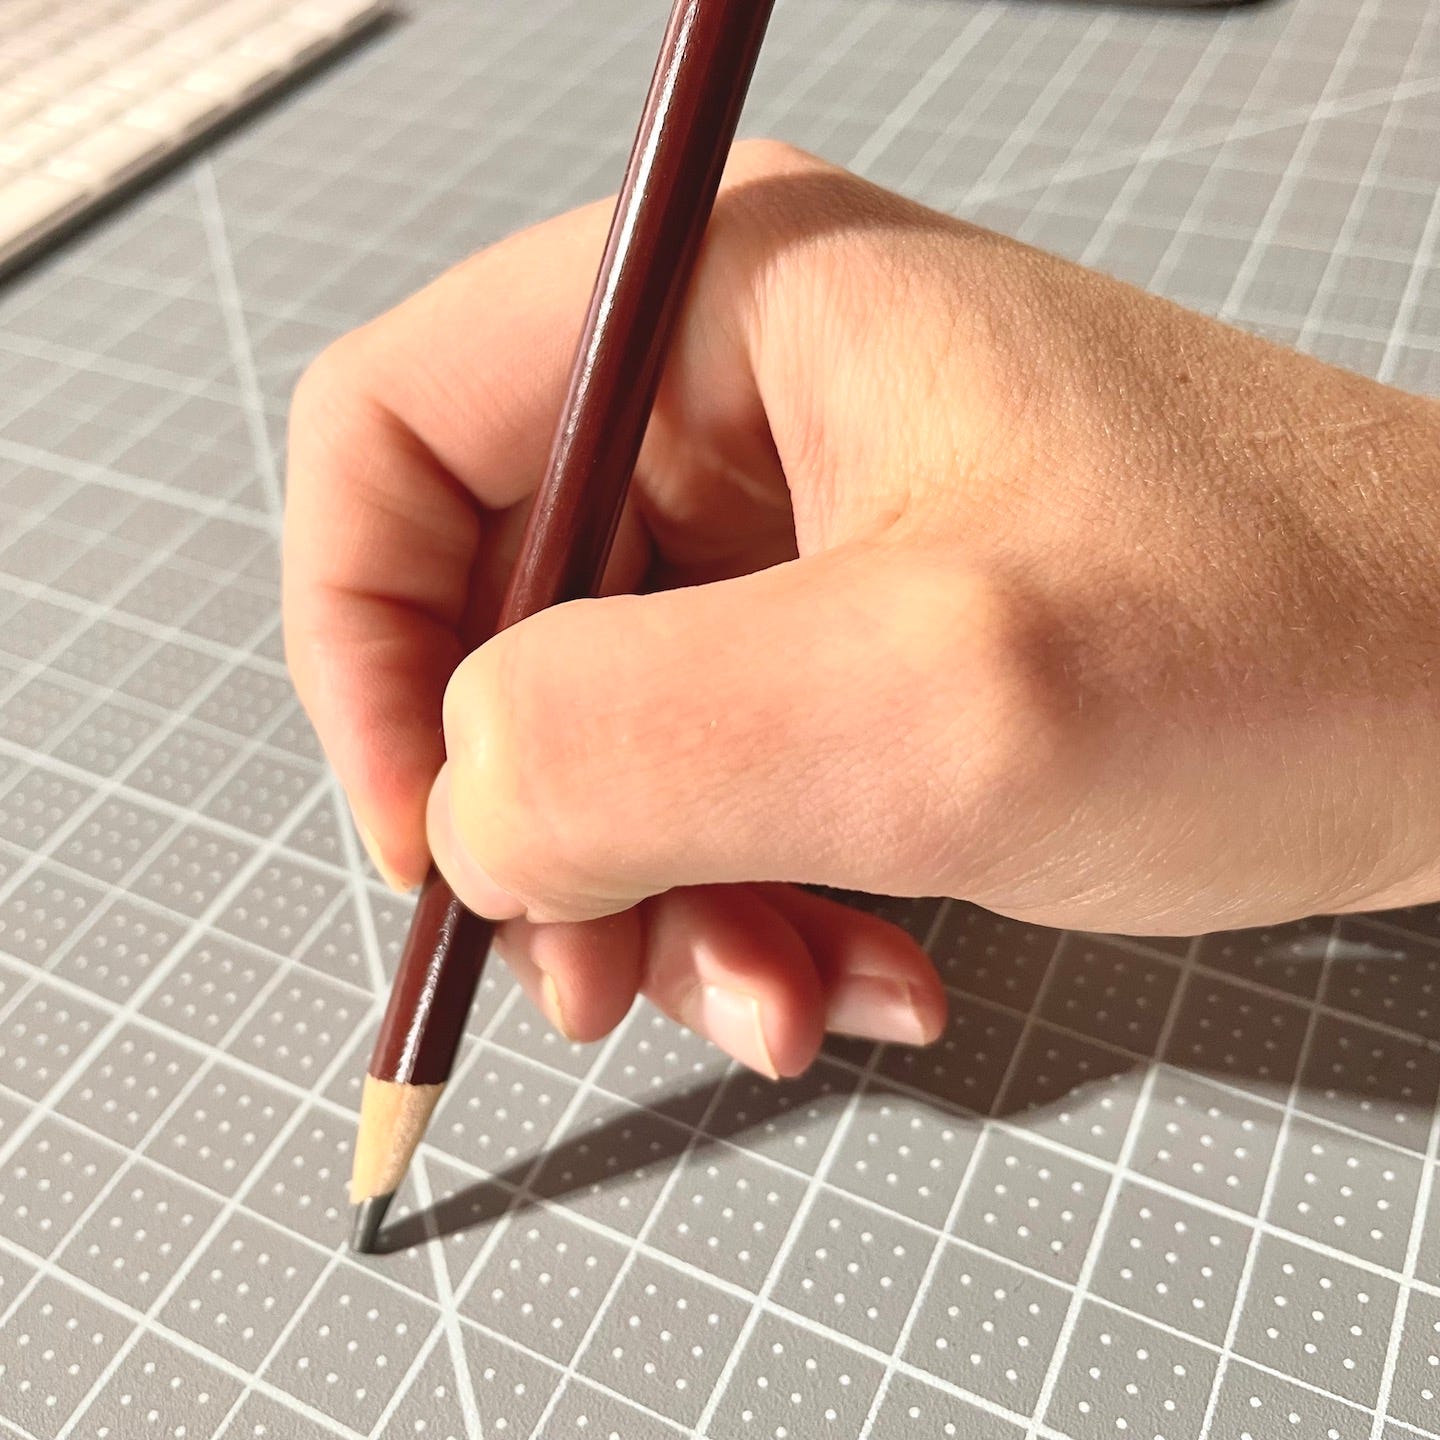
Your fingers should have a relaxed curve. Use the fingertip, rather than the flat area of the fingerprint. A tight grip can be observed when the forefinger begins to bend the wrong way.
Many people overlook the fourth point of contact the pencil has with the hand. Be sure that the pencil is upright, resting on the knuckle of the first (pointer) finger. In a careless grip, it will often slip sideways into a more horizontal position, resting on the web between the thumb and forefinger.
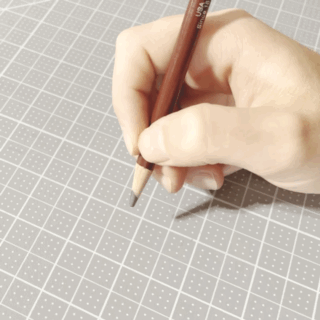
In the Tripod Grip, the pencil has a total of 5 points of contact, which allow for both flexibility (within a small area) and stability, with a high degree of control. The five points of contact: The three fingers, the knuckle of the first finger, and the point of the pencil against the paper.
Holding the pencil upright by resting it against the knuckle means that the majority of the pencil’s weight is on the pencil’s point. This is very helpful in reducing fatigue. In drawing, the artist frequently wants to make marks as lightly as possible, and the weight of the pencil alone is more than sufficient.
The Exercise:
Use a ruler to draw a 3” square. Fill the square neatly with freehand vertical lines. (Do not use a ruler to draw these lines.) They should be fairly close together, and you should strive for as straight of lines as possible.
The Overhand Grip
The Overhand Grip is the next most common grip artists need to add to their arsenal. It is very simple to do:
Lay your pencil flat on the paper, point directed away from your dominant hand. Pinch the pencil between thumb and middle finger and pick it up, wrapping your fourth finger and pinky gently, in a relaxed manner, around the pencil shaft. Extend your forefinger closer to the point in a natural, relaxed position. Your forefinger controls the pressure on the point.
Most of your motion will come not from the fingers, which are pretty stationary in this grip, but from the wrist, elbow, or shoulder. This is what makes the Overhand Grip so useful to artists: it allows us to make significantly larger marks by using the joints of our bodies that produce larger motions.
Notice that this grip is ideal for using the side of the pencil’s lead, rather than the point. This allows the artist to make broad strokes and cover areas of the drawing much more quickly. It is also significantly easier to create even gradations with this grip.
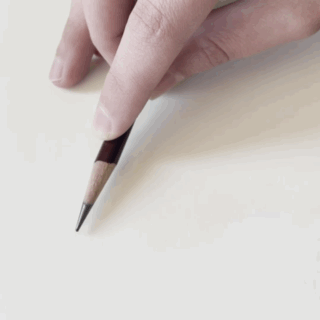
TIP: Though your hand does not rest on the paper when using this grip, you can use your pinky (or pinky and fourth finger, as above) as a stabilizer. These fingers can help control the angle of the pencil in relation to the paper.
You will notice right away that this grip feels significantly less controlled than the Tripod Grip. This makes it uncomfortable for some people, but it is an essential grip for the artist to learn, so stick with it.
TIP: If you find yourself unconsciously switching back to the Tripod Grip, enlist the help of a family member or friend. Have them watch you while you draw for a while, and indicate to you each time you make the unconscious switch back. This is a common occurrence, and will lessen as you become more familiar with the new grip.
The Exercise:
Use a ruler to draw a 3” square. Using the flat side of the pencil lead and the Overhand Grip, fill the box neatly with a middle-gray value. All your strokes should go the same direction. Strive for an even tone, without lines or streaks.
Grips to Draw Lightly
In order to advance and make full use of the Drawing Process, artists need to develop enough control over their pencils to be able to draw both very softly (lightly), and very hard, with thick, dark lines. Drawing hard is usually the easiest, and it can take a lot of practice to draw softly. There are a few grip hacks that can help.

Hold Back
Holding the pencil farther back—away from the point—diminishes the fine control of the Tripod Grip. Moving the grip back is an almost guaranteed way to draw more lightly.
Typically, when students are pushing too hard, especially when they’re unaware of it, their grip has inched closer and closer to the point. Exaggerating the distance between grip and point can help them loosen up—and, because of the diminished control, makes it nearly impossible to press hard.
This also works with the Overhand Grip. The farther the hand is from the business end of the pencil, the more difficult it is to apply pressure to the point.


Hand Howe
The hand is a very versatile and adaptable instrument. There are probably dozens of ways in which to hold a pencil, each with its own perks and pitfalls. One other option, which I have noticed also has the effect of lightening my lines up nicely, is something I picked up from this art of book featuring John Howe (one of the concept artists for the Lord of the Rings movies): John Howe: Fantasy Art Workshop.
Mr. Howe evidently (based on some of the photographs in this book) tucks his pencil in between his fingers in this sort of modified tripod grip:
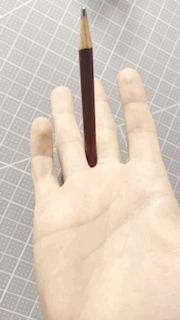
I have found this to be a surprisingly comfortable way to draw, and also quite adaptable:
The grip presents more of the long edge of the pencil for softer, broader lines and gradients of tone.
By using the pinky to tilt the hand up, the point of the pencil can be accessed for detail work with reasonable control—but without as strong an urge to press hard!
Because the fingers are less tightly curled around the pencil, it seems to be more relaxing and less fatiguing to sketch this way.
Whether you end up liking this one at all, it’s interesting enough to warrant a try—and it may help you break out of the clutch of the Tripod Grip. When using this grip, you have to disentangle the pencil from your fingers in order to switch back to the Tripod Grip, so it’s much easier for us to notice when we are switching (which otherwise happens unconsciously for most of us).
The Exercise:
Use a ruler to draw two 3” squares. Fill one with horizontal lines. Lines at the top should be as hard as you can make them while holding your pencil well back. Gradually decrease the pressure as you fill the box, so that the lines at the bottom are barely the weight of the pencil.
Fill the second one with diagonal lines, using the Howe Grip. Make an even transition between dark lines—pressing as hard as you can—and light lines—barely using the full weight of the pencil.
Don’t Let Your Paper Get Away!
Finally, it should be noted that it is just as important to train your non-dominant hand to the work that it should do: namely, keep a tight hold of your paper!
Most adults have learned to use their non-dominant hand to gain some semblance of control over their paper. Still, it does deserve a few reminders:
Use your non-dominant hand to hold your paper in place—but try not to touch your drawing, as this can cause smears.
Be sure to keep your paper a relaxed distance straight in front of your torso.
Be mindful of the edge of the table, so that you do not lean forward and bend or crumple the edge of your drawing.
Have good posture. Don’t flop sideways or backward and lean excessively.
Children sometimes need to be reminded to hold on to their paper with their other hand, as the paper will slip and skitter along while they draw. This can happen more often when they are focusing on holding their pencil correctly. I jokingly remind them, “Don’t let your paper get away!” and they usually take the reminder cheerfully.
Try out each of these grips, and experiment with what kinds of marks you can make when you hold your pencil differently. When doodling and drawing, use your experiments to help you decide which marks to use for particular textures and designs.
HAPPY DRAWING!
Thank you for participating in The Homeschool Art Course. Support my work with a like, comment, and share!